FREE DELIVERY ON MOST ITEMS & ALL ORDERS OVER £500  Call Free

Search Blog Posts...
Installers Directory


Category Posts


Follow Us!
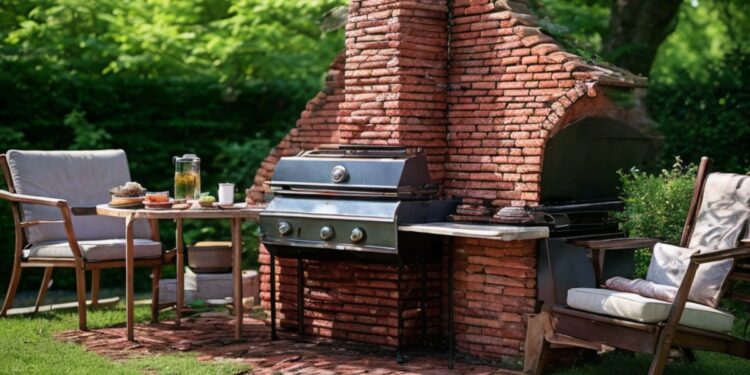
How To Build a Brick BBQ With a Chimney | Posh Living Magazine


Key Takeaways -
- Building a brick BBQ with a chimney enhances outdoor spaces' functionality and aesthetics.
- Detailed planning and proper material selection are essential for a successful build.
- Step-by-step construction ensures a stable and efficient BBQ.
- Regular maintenance and correct testing are crucial for safety and longevity.
Are you thinking about upgrading your outdoor space? Building a brick BBQ with a chimney is a great project that does more than cook your food. It can turn your garden into a stylish and functional gathering spot.
We will show you the benefits of having your own brick BBQ with a chimney. It’s not just about the great flavours it brings to your meals but also about making your outdoor area a better place to relax and entertain.
Whether you’re new to DIY projects or you’ve handled many before, you’ll find valuable tips and steps here. Keep reading to learn how to make your outdoor cooking dreams come true with an outdoor BBQ.

Materials and Tools Needed
Before building your brick barbecue grill with a chimney, you’ll need to gather the right materials and tools. This will ensure your project goes smoothly and results in a sturdy and safe BBQ.
List of Required Materials and Tools:
- Bricks: The main structure of your BBQ will be built with standard bricks. You'll need enough to complete your desired size.
- Mortar: This will bond the bricks together. Make sure to get mortar suitable for high-temperature applications.
- Concrete: Needed for the foundation to provide a stable base for your BBQ.
- Rebar: These metal bars will reinforce the concrete foundation, giving it extra strength.
- Partition Blocks: These larger blocks help form the base of the BBQ and support the grill.
- Firebricks: These are special bricks that line the interior where the actual grilling will happen, as they can withstand higher temperatures.
- Chimney Components: Essential for building the chimney that will vent smoke upward and away.
- Trowels: Used for applying and spreading mortar between bricks.
- Levels: Crucial for ensuring your BBQ walls and base are perfectly horizontal.
- Masonry Saw: You’ll need this to cut bricks and concrete blocks to the right sizes.
- Safety Gear: When cutting and handling materials, remember to wear protective eyewear, gloves, and a dust mask.
Now that your materials and tools are ready, it’s time to start building your brick BBQ with a chimney.
Step 1: Planning and Design
The initial planning and design stage is crucial before diving into the construction of your brick BBQ with a chimney. Here’s what you need to consider:
- Choose a level location away from structures or trees to avoid fire hazards while allowing enough space for guests.
- Decide on the size and dimensions based on your usage frequency and the typical number of guests, ensuring ample grill and food preparation space.
- Ensure good airflow by strategically positioning the chimney and grill to enhance heat control and reduce smoke.
- Check local building regulations to determine if a permit is needed, avoiding potential fines or mandatory modifications later.
Step 2: Site Preparation
After finalising your brick BBQ design, the next essential step is site preparation. Begin by clearing the area of debris, rocks, or vegetation and levelling the ground to prevent any instability.
Use stakes and string to mark the dimensions of the BBQ accurately, ensuring precise alignment for the excavation. Dig at least 6 inches deep for the foundation, frequently checking with a level to maintain an even base.
Proper site preparation is critical as it supports the weight of the BBQ and ensures the structure's functionality and durability.
Step 3: Foundation Preparation
Proper foundation preparation is key to a durable brick BBQ. Start by ensuring the ground within your marked area is flat and compact. This creates a stable base for the concrete.
Next, pour concrete into the excavated site to form the foundation or concrete slab, ensuring it spreads evenly and fills all corners. Use a screed board to smooth the surface. After pouring, allow the concrete to cure fully, which typically takes at least 48 hours.
A well-cured foundation provides the necessary support and longevity for your BBQ, preventing future structural issues.
Step 4: Constructing the Base
Building a strong base is crucial for your brick BBQ. Start by placing partition blocks on the cured foundation to form the first level. Ensure each block is perfectly level and aligned square with the corners of your foundation.
Use a spirit level for accuracy as you lay each block, adjusting slightly with a rubber mallet if necessary. Check alignment regularly as you build up the base. This careful placement ensures the entire structure remains stable and level, which is vital for the longevity and safety of your BBQ.
Step 5: Building the Main Structure

Once the base is set, build the main structure by laying bricks in alternating directions to enhance stability. Use a level to ensure each row is straight and even.
For added strength, insert a rebar between layers and secure it with hydraulic cement, which is crucial for withstanding high temperatures and load. With the designated grill area, integrate the grill section by leaving space for the grill insert and ensuring it's supported by the structure.
Step 6: Creating the Smoker Section
Designing a dedicated smoker section involves using firebricks, which are crucial for their heat-resistant properties. Begin by mapping out a separate area within the main structure specifically for smoking.
Lay firebricks to form this compartment, ensuring it is well insulated and can handle high temperatures without damage to the surrounding structure. Proper ventilation is key to a functional smoker, so incorporate sufficient air inlets and a chimney outlet to maintain airflow.
Step 7: Adding the Chimney
Adding a chimney to your brick BBQ is essential for effective smoke ventilation and improving your cooking setup (1). Here’s how to do it:
- Plan the chimney's size and shape to match the dimensions of your BBQ and ensure it's tall enough for effective smoke escape.
- Gather sturdy materials like bricks, mortar, concrete, rebar, and firebricks.
- Start by laying a stable base with partition blocks.
- Continue building up the chimney, stacking bricks in alternating directions for stability.
- Reinforce the structure with rebar and hydraulic cement every second course.
- Complete the chimney with more brickwork and add a concrete lid with an opening for better smoke management.
- Securely attach the chimney to the BBQ using mortar and rebar to ensure it remains stable and functional.
Testing and Initial Use

Before you host a big garden BBQ, ensure your new brick barbecue is ready for action. First, allow the structure to cure completely; this process typically takes several days and is essential for the BBQ's integrity and safety. Once cured, conduct a small test fire.
This initial burning is to enjoy your first meal and verify that the chimney and airflow systems are functioning correctly, ensuring smoke is efficiently vented, and the heat is evenly distributed. This step confirms the functionality and safety of your BBQ before it’s fully put to use.
Frequently Asked Questions
What Should I Do If There Are Excess Mortar and Debris on My BBQ?
If your brick BBQ has excess mortar and debris after construction, it's important to clean it to maintain its appearance and integrity. Start using a wire brush or an angle grinder with a wire wheel to remove any loose mortar and debris from the brick surfaces.
For more stubborn mortar deposits, employ a hammer and chisel or a 5-way knife with the handle taped up to chip away the excess carefully. Regular cleaning will keep your BBQ looking neat and professional.
Which Is More Cost-Effective, Building a Brick BBQ or Buying One?
Building a brick BBQ is often more cost-effective than purchasing a pre-made unit. If you have access to affordable materials and are skilled in DIY projects, you can save significant money.
However, the cost-effectiveness also depends on your specific circumstances, such as your budget and preferences. Consider both options based on your situation and your value on customisation.
How Long Does It Take to Build a Brick BBQ With a Chimney?
The time required to build a brick BBQ with a chimney varies widely. It can take anywhere from a couple of days to several weeks, depending on the complexity of the design, the builder's experience, and the daily time dedicated to the project.
Planning, acquiring materials, and the actual construction phase all contribute to the total time spent on creating your BBQ.
Conclusion

In conclusion, building a brick BBQ with a chimney is a rewarding project that enhances your outdoor cooking experience and adds value to your home.
Following these detailed steps, you can create a durable and functional BBQ tailored to your needs. Whether you build it yourself or opt for a pre-made unit, a brick BBQ with a chimney is a great addition to any outdoor space, promising many enjoyable gatherings and delicious meals.
Remember, the success of your project depends on careful preparation, the right materials, and a bit of patience. So, gather your tools and get ready to impress your friends and family with your newly built brick BBQ.
Sources -

Sauna and spa expert with years of experience in the field. You can see me featured in many leading publications as well as my own published research papers. Fitness, health, home improvement and Psychology are my main interests. I’ve worked in many roles from product designer to purchaser for spa products, garden furniture and tech to a hands-on webmaster.
SHOP THE SALE
Big Sale Event Now On
We've dropped prices on some of our leading luxury items
So you can enjoy the luxury you deserve for a whole lot less!
